How to Lay Landscape Fabric: Complete Installation Guide for Weed-Free Yards
Look, I get it. Weeds are the worst. They pop up everywhere, ruin your flower beds, and make your yard look messy, no matter how much work you put in. That’s where landscape fabric comes in; it’s basically your secret weapon for keeping those pesky weeds under control while still letting water and air reach your soil.
If you’re planning a full outdoor makeover, you might want to start with our guide on How to Landscape Your Front Yard to get the big picture sorted first.
In this guide, I’m going to walk you through everything you need to know about installing landscape fabric, whether you’re a complete beginner tackling your first DIY project or a homeowner who just wants to get it done right. No fancy landscaping degree required, just a willingness to get your hands a little dirty.
What Exactly is Landscape Fabric?
Think of landscape fabric (also called weed barrier or weed control fabric) as a protective blanket for your soil. It’s a permeable material that blocks sunlight from reaching weed seeds, which stops them from growing. But here’s the genius part: it still lets water, air, and nutrients flow through to feed your plants.
Unlike plastic sheeting that suffocates your soil, breathable landscape fabric maintains proper drainage and moisture levels. Your plants get what they need, weeds don’t. Simple as that.
The main difference between landscape fabric and a regular weed barrier is really just terminology; they’re the same thing. But landscape fabric versus plastic? That’s a whole different story. Plastic blocks everything, including water, which leads to pooling and sad, dying plants. Fabric is permeable and plays nicely with your garden ecosystem.
Choosing the Right Type of Landscape Fabric
Not all fabric is created equal. You’ve got options depending on what you’re trying to accomplish.
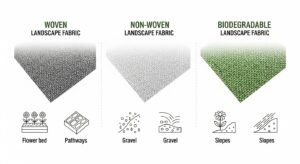
Woven landscape fabric is your heavy-duty workhorse. It’s made from polypropylene threads woven together, making it super durable and UV-resistant. Perfect for walkways, driveways, or anywhere you need serious weed blocking power. The downside? It’s less permeable than other types, so water flow can be slower.
Non-woven landscape fabric is softer and more flexible. It’s made from fibres pressed together, kind of like felt. This stuff is great for flower beds and vegetable gardens because it has excellent drainage. It’s not as tough as woven fabric, but it’s easier to work with and cut around plants.
Biodegradable landscape fabric breaks down over time, which sounds bad but can actually be ideal for temporary projects or areas where you want the fabric to eventually become part of the soil. Think cardboard or natural fibre materials.
For commercial projects or high-traffic areas, you’ll want commercial or heavy-duty options that can handle serious abuse. These cost more but last way longer.
Here’s my quick breakdown:
- Flower beds and gardens: Non-woven
- Pathways and under gravel: Woven
- Around trees and shrubs: Non-woven
- Driveways or slopes: Heavy-duty woven
What You’ll Need Before You Start
Let’s talk tools and materials. Nothing crazy here, most of this stuff you might already have lying around.
You’ll need:
- Landscape fabric rolls (obviously)
- Landscape fabric staples, pins, or anchors to hold everything down
- Measuring tape
- Sharp utility knife for cutting
- Edging material (optional but recommended)
- Whatever you’re putting on top, mulch, gravel, rocks, or pavers
The staples are really important. Some people try to skip them or use too few, and then they’re out there six months later, wondering why their fabric is bunched up, and weeds are poking through. Don’t be that person.
Preparing Your Ground (Don’t Skip This Part)
This is where most people mess up, so pay attention. The prep work is honestly more important than laying the fabric itself.
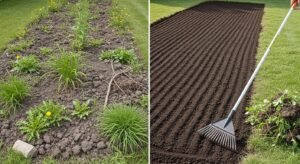
First things first: remove any existing weeds. All of them. Pull them out by the roots. If you lay fabric over weeds, they’ll just keep growing and push right through. I’ve seen it happen, and it’s not pretty. Next, level out your soil. Walk around and look for dips, bumps, or areas where water might pool. Fix those now. Use a rake to smooth everything out. If your soil is compacted, break it up a bit to improve drainage.
For slopes or areas prone to erosion, you might need to do some grading to make sure water flows the right way. Water should move away from buildings and not create rivers in your yard when it rains.
Some people add soil amendments at this stage, compost, topsoil, whatever your plants need. That’s fine, but do it before the fabric goes down. You won’t be able to easily work the soil later.
How to Lay Landscape Fabric: The Step-by-Step Process
Alright, here’s where the actual work happens. Take your time with this; rushing leads to mistakes.
Step 1: Measure and Cut Your Fabric
Measure the area you’re covering. Add a few extra inches on all sides. You can always trim later, but you can’t add fabric back. Roll out your fabric and cut it with your utility knife. If you need multiple pieces, that’s totally fine.
Step 2: Lay It Down the Right Way
Most landscape fabric has a fuzzy side and a smooth side. The fuzzy side usually goes up (check your specific product instructions). Lay your fabric over the prepared area, making sure it’s flat with no wrinkles or bunched-up sections.
Step 3: Overlap Your Seams Properly
If you’re using multiple pieces, overlap them by at least 6 to 12 inches. This prevents weeds from sneaking through the gaps. I usually go with 8 inches to be safe. The overlap should point away from the direction water flows, kind of like roof shingles.
Step 4: Secure Everything
Now grab those staples or pins. Space them about 3 to 4 feet apart along the edges and seams. For slopes, curves, or windy areas, use more, every 2 feet or so. Push them in firmly so they’re flush with the fabric. You don’t want anything sticking up to trip on or catch on garden tools.
Installing Fabric in Different Spots
Every area of your yard has different needs, and proper Landscape Design and Installation means choosing the right method for each space. Here’s how to handle the most common situations.
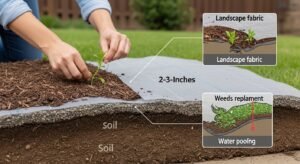
Under mulch: Lay your fabric, secure it, then spread 2 to 3 inches of mulch on top. The mulch protects the fabric from UV damage and looks nice. Just don’t pile it too thick, or it’ll trap moisture.
Under gravel or rocks: Same basic process, but you’ll want heavier-duty woven fabric since gravel can be sharp. Make sure your fabric is really secure before dumping rocks on it.
Around trees and shrubs: Cut an X-shaped slit where each plant goes, then slide the fabric around the base. Don’t wrap it tight against the trunk; leave a few inches of space for growth and air circulation.
In flower beds: Use the lighter non-woven stuff and cut holes where you want to plant. You can plant first and then cut the fabric to fit around them, or cut holes and plant through the fabric.
For pathways and walkways: Woven fabric works great here. Make sure your path edges are well-defined with edging material to keep everything contained.
On slopes: This is tricky. You need extra anchoring; use way more staples than you think you need. Consider pinning every foot or two to prevent sliding.
Edging and Finishing Touches
Once your fabric is down and covered, trim any excess edges with your utility knife. If you’re using edging (metal, plastic, or stone), install it now to hold everything in place and create clean lines.
The goal is to make sure no fabric is exposed to sunlight. UV rays will break down the material over time. That’s why you always want at least 2 inches of mulch, gravel, or whatever covering on top.
Mistakes People Make (And How to Avoid Them)
Let me save you some headaches by pointing out the most common problems I see:
Installing over existing weeds. Seriously, pull them first. Persistent weeds will punch right through.
Poor overlap or loose anchoring. If your fabric can move or if seams aren’t overlapped enough, weeds will find a way through.
Using the wrong type. Plastic under your flower beds? Bad idea. Heavy woven fabric in your veggie garden? Also not great. Match the fabric to the job.
Drainage issues. If water pools on top of your fabric, you either didn’t prepare the ground properly or you’re using fabric that’s not permeable enough. Fix this before it kills your plants.
Soil compaction. Walking on fabric before covering it can compact the soil underneath and create drainage problems later.
The truth is, landscape fabric has both pros and cons. It’s not a miracle solution. It works great for pathways and under hardscaping, but it’s less ideal for vegetable gardens where you’re constantly digging and planting.
Keeping Your Fabric in Good Shape
Landscape fabric can last anywhere from 5 to 20 years, depending on the quality and how well you maintain it. UV-resistant commercial-grade stuff lasts the longest.
Maintenance is pretty simple. Keep at least 2 inches of mulch or gravel on top to protect from sun damage. Pull any weeds that do manage to poke through (they’ll be easy to remove since they can’t root deeply). Every year or two, add a fresh layer of mulch as the old stuff breaks down.
Eventually, you might need to replace or remove your fabric. Signs it’s time: visible deterioration, lots of weeds growing through, or water pooling on the surface. Removing old fabric is tedious but straightforward; just pull up the staples and roll it up.
When You Shouldn’t Use Landscape Fabric
Sometimes alternatives work better. A thick layer of organic mulch alone can suppress weeds pretty effectively and actually improves your soil as it breaks down. Cardboard or newspaper under mulch is a cheap, biodegradable option that works great in the short term.
Native ground covers can also outcompete weeds naturally while looking beautiful and supporting local wildlife. They’re especially good for slopes where you need erosion control.
Skip the fabric in vegetable gardens or anywhere you’ll be digging regularly. It just gets in the way.
What Does This All Cost
Landscape fabric prices vary widely. Budget rolls might run you $0.10 to $0.25 per square foot. Premium, heavy-duty commercial fabric can cost $0.50 to $1.00+ per square foot. Staples and pins add another $10 to $30 for a box.
For most homeowners, you’re probably looking at $50 to $200 total for a typical project, depending on size. You can buy it at any home improvement store or search “landscape fabric near me” to find local suppliers. Online usually has a better selection, but factor in shipping costs.
DIY or Hire Someone?
Installing landscape fabric is totally doable as a DIY project if you’ve got a free weekend and don’t mind some physical work. It’s not complicated, just time-consuming.
That said, if you’re dealing with a huge area, serious slopes, or complex landscaping, calling in professionals might make sense. They’ve got the experience to avoid common mistakes and can usually knock it out in a fraction of the time.
If you’re in the Charlotte area and want expert help with installation or a full landscaping project, check out our Landscapers in Charlotte, NC to find trusted professionals.
Final Thoughts
Installing landscape fabric isn’t rocket science, but doing it right makes all the difference. Prep your ground thoroughly, choose the right type of fabric for your needs, overlap and secure everything properly, and keep it covered. Do those things, and you’ll have way fewer weeds and way more time to actually enjoy your yard.
Now get out there and make your landscape look amazing. Your future self will thank you when you’re not spending every weekend pulling weeds.